一覧へ 前へ<< >>次へ
Arduino + MAX31855 〜K熱電対での測定〜 (2021年08月03日更新)
|
このサイトを参考にさせてもらいましたが、基盤の製品が違うので、繋ぎ方の辺りからは思考錯誤。。。
https://synapse.kyoto/hard/MAX31855_breakout/page001.html |
| 【準備】 温度測定用ライブラリのダウンロード |
 https://github.com/adafruit/Adafruit-MAX31855-library https://github.com/adafruit/Adafruit-MAX31855-library
からClone or Download をクリックして、
Adafruit-MAX31855-library-master.zip
をダウンロードします。
|
|
 で、フォルダ名の -master を消すのだそうです。 で、フォルダ名の -master を消すのだそうです。 |
|
|
|---|
その後、名前を変更したフォルダごと、
ArduinoIDEの libraries フォルダの下に保存(フォルダごと移動)します。 |
| ArduinoIDEを起動 |

すると、ファイル → スケッチの例 → AdafruitMAX31855 library
と追加されていました。
|
| が、線のつなぎ方が判らない! |
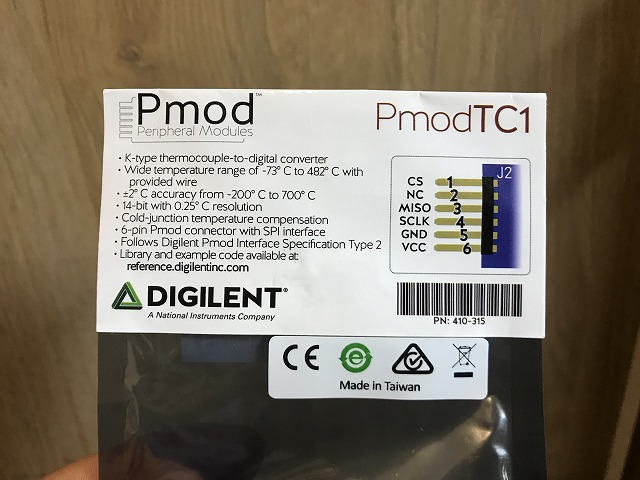 製品の入っていた袋には、コネクタのイラストがありました。 製品の入っていた袋には、コネクタのイラストがありました。
CS
NC
MISO
SCLK
GND
VCC
と書かれています。 |
|
しかし、GNDとVCC以外は何のことか判らない。
メーカであるDIGILENT の製品サイトを眺めていると、これらの文字の意味が書かれていました。
 CS  Chip Select (Active High)
 NC    No Connection
 MISO  Master In slave Out (Data from Slave to Master)
 SCLK  SPI Clock
 GND   Ground
 VCC   Positive Voltage Supply
でもまだNCが解読できただけで、他の意味が判りません。
SPIで検索すると、Wikipediaにシリアル・ペリフェラル・インタフェースと記載されたサイトがヒットしました。
シリアル・ペリフェラル・インタフェース
”シリアル・ペリフェラル・インタフェース(Serial Peripheral Interface, SPI)は、コンピュータ内部で使われるデバイス同士を接続するバスである。パラレルバスに比べて接続端子数が少なくて済むシリアルバスの一種で、比較的低速なデータ転送を行うデバイスに利用される。”のだそうです。
SPIという通信システムをArduinoで利用するということなのか。。。
(あとになって、秋月電子のサイトに バス:SPIと記載があることに気づきました)
日本語リファレンスにSPIの説明がありました。
日本語リファレンス → SPI
ここには、
Arduino Uno(ATmega168/328を搭載するボード): 10(SS)、11(MOSI)、12(MISO)、13(SCK)
と記載がありましたが。。。
次の項に記載するサンプルプログラムには、ピンの番号らしきものが記載されています。
このプログラムを見ると、任意のデジタルのピンに割り当てることができるようにも思えます。
|
| プログラムの一部を抜粋 |
// Example creating a thermocouple instance with software SPI on any three
// digital IO pins.
#define MAXDO 3
#define MAXCS 4
#define MAXCLK 5 |
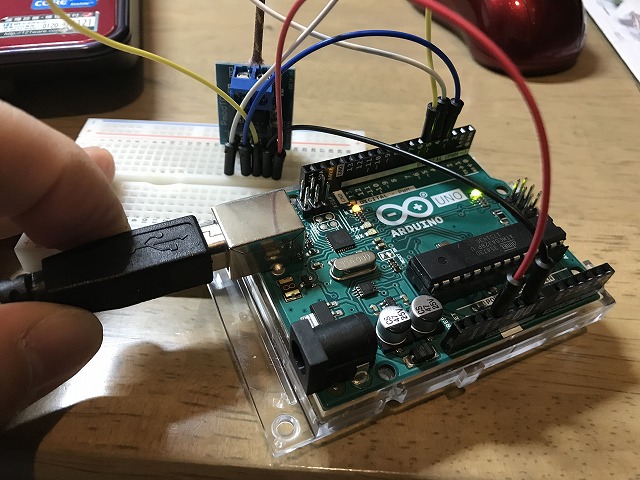
| 試しに接続・・・ |
プログラムにかかれた番号を信用して、
#define MAXDO 3
#define MAXCS 4
#define MAXCLK 5
DOはData Out? → MISO を3ピンに接続。
CSはChipSelect → CS を4ピンに接続
CLKは、SPI Clock → SCLK を5ピンに接続
と解釈してみました。
あとは、
VCC を 3.3Vに接続、GNDはGNDへ。
|
| スケッチをコンパイルして転送・・・ |
|
|---|
シリアルモニタを起動すると、測定値が表示されました。
用意したライターで熱電対の先端を炙ると、それなりの数値が出ました。
以下に、表示された数値をコピペします。
(Internal Tempはどうやって測っているのだろう?)
MAX31855 test
Internal Temp = 24.37
C = 33.00
Internal Temp = 25.19
C = 33.00
Internal Temp = 25.37
C = 32.75
Internal Temp = 25.50
C = 32.25
Internal Temp = 25.62
C = 78.50
Internal Temp = 25.69
C = 225.25
Internal Temp = 25.75
C = 359.50
Internal Temp = 25.81
C = 436.75
Internal Temp = 25.81
C = 541.50
Internal Temp = 25.81
C = 642.50
Internal Temp = 25.87
C = 498.50
Internal Temp = 25.87
C = 399.25
Internal Temp = 25.87
C = 329.25
Internal Temp = 25.87
C = 277.75
Internal Temp = 25.94
C = 236.50
Internal Temp = 25.87
C = 207.50
Internal Temp = 25.94
C = 185.25
Internal Temp = 25.94
C = 167.00
|
| 最後に・・・ |
サンプルプログラム全体を貼り付けます。
HTMLの表示の関係で、<>は半角を全角にしています。
#include <Adafruit_MAX31855.h>
/***************************************************
This is an example for the Adafruit Thermocouple Sensor w/MAX31855K
Designed specifically to work with the Adafruit Thermocouple Sensor
----> https://www.adafruit.com/products/269
These displays use SPI to communicate, 3 pins are required to
interface
Adafruit invests time and resources providing this open source code,
please support Adafruit and open-source hardware by purchasing
products from Adafruit!
Written by Limor Fried/Ladyada for Adafruit Industries.
BSD license, all text above must be included in any redistribution
****************************************************/
#include <SPI.h>
#include "Adafruit_MAX31855.h"
// Default connection is using software SPI, but comment and uncomment one of
// the two examples below to switch between software SPI and hardware SPI:
// Example creating a thermocouple instance with software SPI on any three
// digital IO pins.
#define MAXDO 3
#define MAXCS 4
#define MAXCLK 5
// initialize the Thermocouple
Adafruit_MAX31855 thermocouple(MAXCLK, MAXCS, MAXDO);
// Example creating a thermocouple instance with hardware SPI
// on a given CS pin.
//#define MAXCS 10
//Adafruit_MAX31855 thermocouple(MAXCS);
void setup() {
Serial.begin(9600);
while (!Serial) delay(1); // wait for Serial on Leonardo/Zero, etc
Serial.println("MAX31855 test");
// wait for MAX chip to stabilize
delay(500);
}
void loop() {
// basic readout test, just print the current temp
Serial.print("Internal Temp = ");
Serial.println(thermocouple.readInternal());
double c = thermocouple.readCelsius();
if (isnan(c)) {
Serial.println("Something wrong with thermocouple!");
} else {
Serial.print("C = ");
Serial.println(c);
}
//Serial.print("F = ");
//Serial.println(thermocouple.readFarenheit());
delay(1000);
} |
|